Configuring Road Tankers Module
With FuelTaxi, customers can purchase fuel with delivery to the specified place – to the office, home, or even on the highway.
Each region may have one or more FuelTaxi centers. The FuelTaxi Center – it’s an office that distributes customers’ orders. This center determines a list of fuel products, prices, and conditions for the delivery. If there are several FuelTaxi centers in one region, then the customer will be able to choose where he wants to order fuel. If there is only one such center, then the customer will not have the ability to choose a center and the application will immediately offer to select fuel and quantity.
Fuel payment
It’s possible to set up different types of payment:
- Do not accept payment (the customer will create an order without payment and pay for fuel only after refueling).
- Payment required (pre-authorization of money: funds will be reserved on the bank card until the fuel is shipped and will be charged only for the actually provided fuel)
- Payment is possible (by enabling this option, the customer will have the choice to pay immediately or after receipt)
We recommend choosing the payment type “Payment required”, because in this case, the customer immediately pays the shipping cost along with the order.
If the customer pays for the order and delivery after receipt, then in case of any unexpected situations, the driver will drive for free and will not receive payment for this delivery.
Types of delivery and fees
In each FuelTaxi center, you can configure several delivery options with different prices. For example, “Delivery” and “Express delivery”. Each of these options can be configured in one of the following ways: delivery depends on the check amount, mileage and percentage of the amount. Details below.
How to set up FuelTaxi in the Business Control Panel
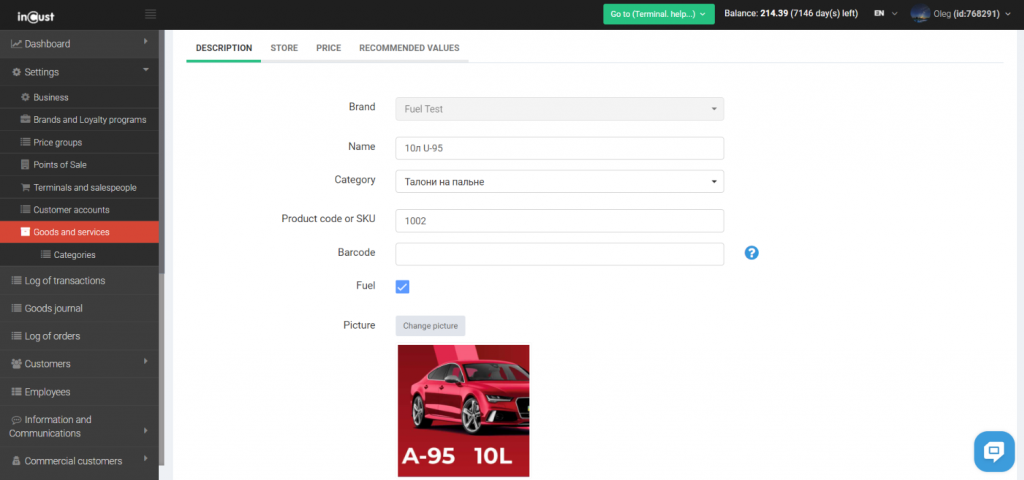
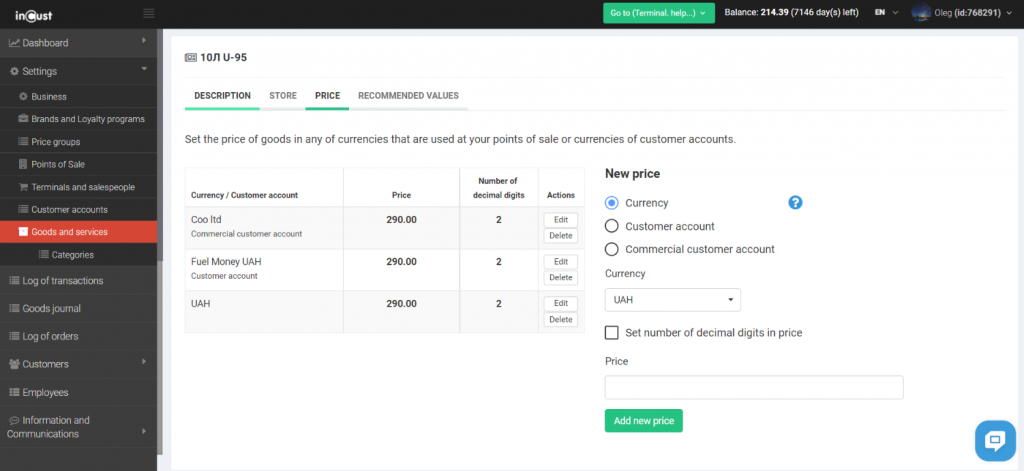
The next step is to add products and prices. In the “Settings” tab, go to the “Goods and Services” submenu and create a “New Goods or Service”. We fill in the fields of the “Description” tab for each product, in the “Store” tab we check the “Display in Store” option and fill in the name and description in different languages, if necessary. Also, fill in the “Price” tab and set the currency and price of the goods.
In the “Goods and Services” section, you need to enter all the goods that will be available to customers.
3. Adding FuelTaxi center, setting up an online store
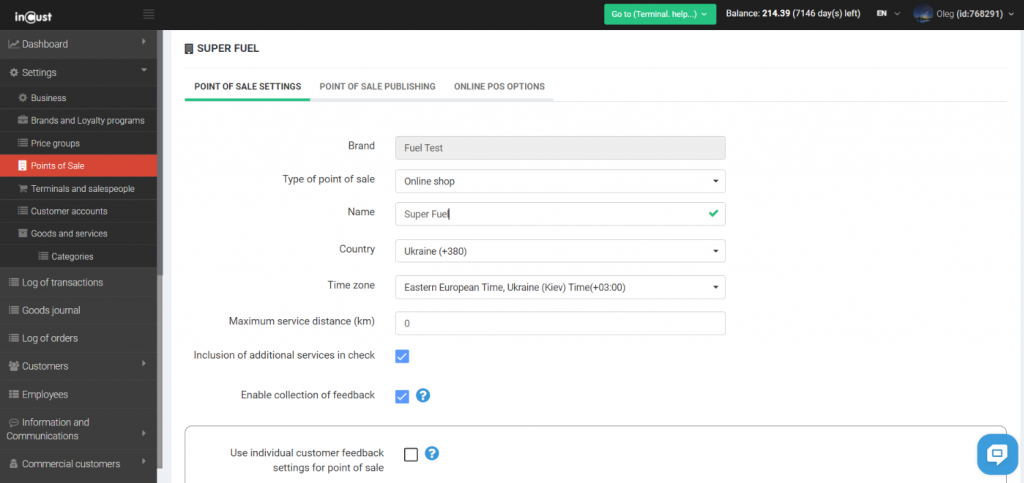
Next step, we create a FuelTaxi center. In the Business Control Panel, go to the tab – “Points of sale”. You need to create a “New Point of Sale”.
IMPORTANT! In the “Type of point of sale” item, you must select “Online shop”. Only with this type of point of sale, this functionality works.
Fill in all other fields: name, country, time zone. We activate the option “Inclusion of additional services in check”, and add additional delivery services to the check.
If the FuelTaxi center wants to limit the service area, you need to indicate in the field “Maximum service distance, km” at what maximum distance from the FuelTaxi center a customer can make an order. If the customer is outside this zone, then he will not see this center in the available options.
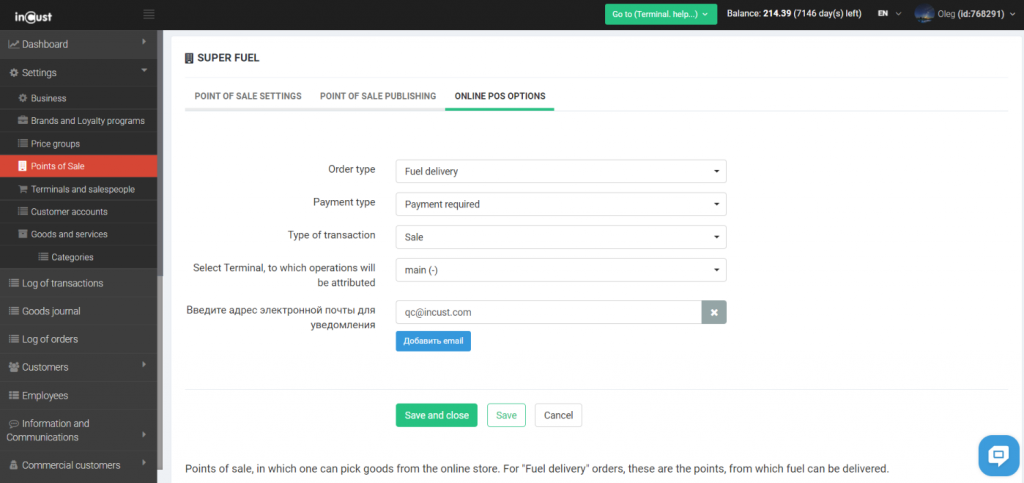
When the type of point of sale “Online shop” is selected, the “Online POS option” tab appears on top, then you need to configure it too.
“Order type” – select “Fuel delivery”.
In this field, we indicate how we should process the accepted order. For FuelTaxi we have to select “fuel delivery”.
“Payment type” – here you can set up options for accepting payments. By choosing “Do not accept payment”, the customer will create an order without payment and pay for the fuel after refueling. When the “Payment required” option is enabled, the customer will not be able to create an order without paying for it using one of the specified methods. “Payment only with bonus points” – the customer will be able to place an order and pay for it only with credited bonus points, while delivery can only be paid for with money. “Payment is possible” – by enabling this option, the customer will have the choice to pay immediately or after receipt.
“Type of transaction” – this option allows you to configure the acceptance of payments from customers. IMPORTANT! For the FuelTaxi, must be selected the “Authorized payment” option.
“Authorize payment” – for this type of payment, confirmation of the order by the operator in the Business Control Panel is required, only after that, the money will be transferred to the business (with this type of transaction, it is possible to change the receipt, for example, change the amount of fuel). Since FuelTaxi can ship less fuel than ordered, only “authorized payment” is can be chosen.
In general, for any online shop, there are the following options (we give this information just to describe the options):
“Sale” – after payment, the money immediately comes to the business account.
“Reserve” – after registration of the order, money will be pre-authorized from the customer’s bank account, but will be transferred to the business only after the actual sale of fuel, after the order is created, it cannot be changed.
“Select Terminal, to which operations will be attributed” – select the terminal through which sales will be registered. One center – one terminal.
“Enter an email address for notification” – requests from customers will be sent to this email address (there may be several)
Below you can add all points of sale from which fuel will be delivered. A business can add, remove, and turn them on and off, as well as change their parameters.
And the last step set up delivery. To do this, go to the “Settings”, “Brands and Loyalty Programs” tab. We select the brand and in the upper tabs go to “Delivery service settings and fees”.
Click the “Add delivery method” button. Fill in “Name” and “Name and description in different languages”.
“Type of service or fee” – choosing “Delivery Services”, a business can set the cost of delivery depending on the distance or amount of the purchase:
- Delivery depends on the amount of the check (a business can set the cost of delivery depending on the amount of the order. For example, up to $100 – $10, from $100 to $300 – $15)
- Delivery depends on the mileage (a business can set the cost of delivery depending on the distance. For example, up to 50km – $10, from 50 km to 100 km – $20)
And by choosing the “Fee” option, you can set the cost as a percentage of the amount (a business can set the delivery cost as a percentage of the order amount. For example, when the order is up to $100 – 5%, from $100 to $300 – 3%)
“Sort order weight” – in this field, you specify the order in which delivery options are displayed to the customers. For example, you have three types of delivery, in order to assign a serial number to them, you should write 1, 2, or 3 in this field for each of them.
“Code of service or fee” – here you need to write the code of this service for the system, it can be a word or a word with numbers
“By default” – enabling this option, this type of delivery will be the main
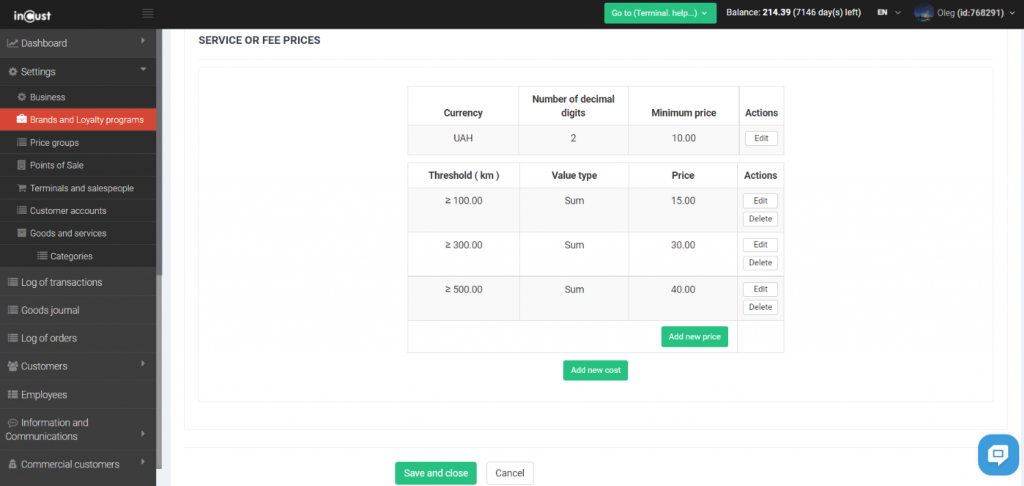
Next, you need to set up “Service prices or fee prices”
In this subsection, you add a new cost, specify the delivery currency, and the minimum price. Below you specify the threshold values for mileage (up to 200 km, up to 300 km…), in the line “Value Type” you can select “Sum” (the customer pays a specific amount for a certain mileage), “Percentage” (the customer will pay a percentage of the purchase amount), “ Multiplier” (you can set the payment of a certain amount for each kilometer).
Now your delivery centers and shipping terms are set up, your customers can start placing their orders.


