How to arrange distribution of tickets with the help of inCust?
Often, businesses face the problem of how to issue and distribute Electronic tickets. Depending on the situation, these e-tickets should be sold or distributed free of charge, delivered to the final consumer, or validated and stamped, controlling the fact of attending the event. All these tasks can be done easily with the help of the inCust platform.
In our experience, this type of task appears in order to track and control visits of events. inCust elegantly solves this problem – with the help of the “Coupon” object, which has a number of characteristics, inherent in traditional tickets.
This object can be sold:
- through the cash terminal
- online
- in an e-shop
- with payment within the mobile application o
- with the help of the app – by scanning the QR code
This object can be distributed:
- via SMS
- via instant messengers,
- in social networks
It can be placed into an e-wallet of a customer, and after this, the owner of the wallet will be able to identify themselves at the event by providing the mobile phone number.
These objects can be validated and stamped. For this, inCust offers a software solution, inCust Steward, which has a dedicated mode of operation, “Validator,” in which an employee can check the validity and stamp visitors’ tickets.

Also, the customer can receive a ticket in the form of
- an email message with a QR code
- barcode, in paper form
- get a ticket number in an SMS message
Tickets can be issued with a different numbering system and the possibility of additional control.
Also, an important function is the option to display a special control code, for example, when redeeming a ticket (the so-called “external code”). This code allows a third-party system or person to unambiguously determine whether the customer has the right to pass. This code is reminiscent of a gift code under a protective coating in the lottery. At your request, it is shown only when the ticket is redeemed (when you erase the protective coating), or always. Those ticket analogy – each ticket has its own unique or common code for the series. And each ticket has its own “external code” (control code), which can be shown upon redemption (use).
An external code (control code), by the way, can be generated by the inCust system itself, or you can load codes into the system. The function of importing external codes can be important to you if you are distributing tickets for someone else’s event, and it is important for you that no one except the controller sees someone else’s ticket number.
This function is also important when working with state organizations or large companies that would like to be sure that you can only distribute a given number of tickets and do not have the opportunity to issue extra tickets.
Creation
To create and configure tickets, you need an inCust account, which you can set up in 15 minutes on incust.com.
First of all, you need to create a series of tickets. A series of tickets is an analog of a cliche, according to which you will then print (issue) tickets. Therefore, you need to select the menu item: “Create coupon series”.

The first option that you need to pay attention to when creating a coupon series is which ticket number you are going to use – the same for all tickets or individual for each ticket. Uncheck the “Single code for all coupons in the series” option if you are not going to print the same code on all tickets. Typically, the option is used only for printing, or when a distribution method is used, in which it is not possible to issue a unique code (for example, printing in a magazine).
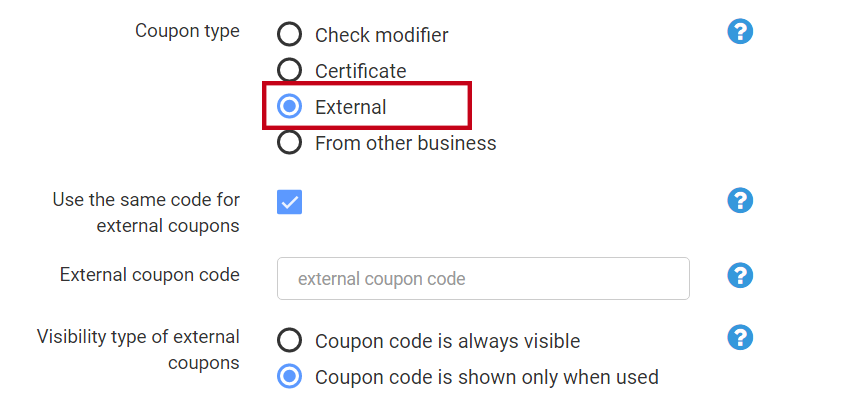
Coupons have various functions: some, for example, give a discount. Tickets give the right only to use and the opportunity to see the external code (control code), so the key for you is to choose the “External” coupon type. Check twice that you have selected the correct type.
The “external” coupon can also be explained as follows: you issue the coupon, and inCust only deals with distribution and verification tasks, therefore it is “external” for the inCust system.

As we described above, an external code is a control code. Usually, it is shown only after redeeming. Therefore, we recommend setting the “Visibility type of external coupons” selector to “Coupon code is shown only when used”. But, sometimes, there is a need to show this control code immediately instead of a unique number. In this case, select the “Coupon code is always visible” option.
Now you need to decide what kind of control code we are showing. It can be the same code or phrase for all tickets.
In this case, set the “Use the same code for external coupons” option and specify your code or phrase.
If you want to see a unique control code for each ticket, then turn this option off. The code in this case can be generated by the inCust system for you (enable the “Generate codes” option), or you can set your list of control codes. This list can be created in any other software, e.g., Microsoft Excel, or it can be transferred to you by the organizer of the event. Then you can import the list from the file. It can be a list in a text file, CSV or Microsoft Excel format.
Some options are rarely used, so if you do not know their functions, it is better to leave them by default.
Distribution
How to deliver a ticket to the customer?
The first option is to issue a set of individual coupons. To do this, you need to tick the “Create coupons when creating a series” option and specify the required number of coupons.

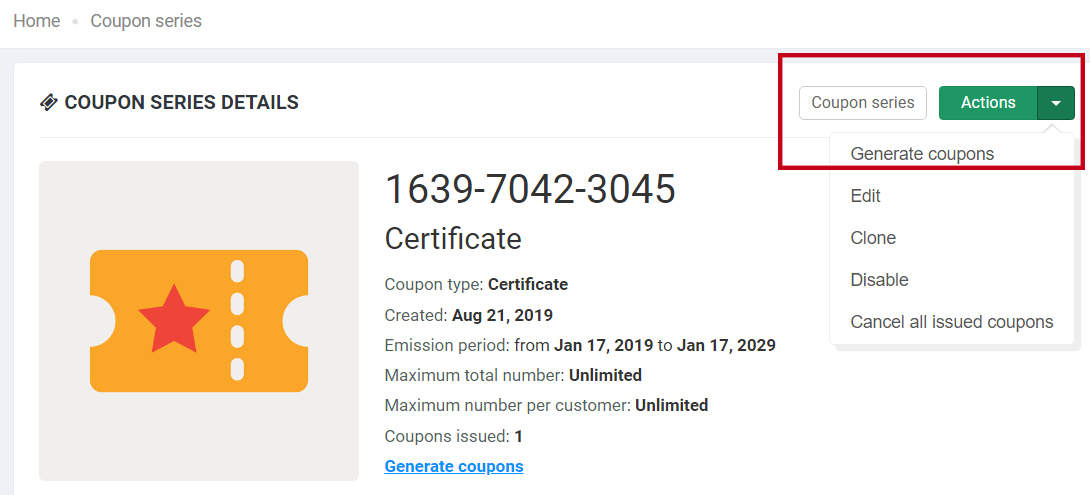
The second option – after creating a coupon series, select the “Coupon series” menu item, and select your series. In the Actions menu, find and use “Issue Coupons.”

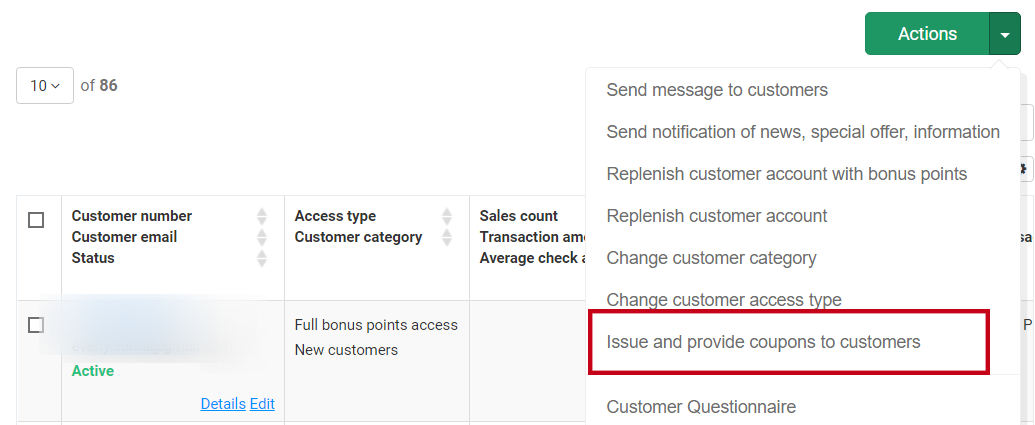
The third option of distributing coupons-tickets among customers is to use the “Customers” section in the Business Control panel. Using this section, you can select an individual customer or use the filter to obtain a group of users (for example, “VIP customers”), then click the “Actions” button, select the “Create and issue coupons to the customer” command and specify the series. Customers will receive a notification that a ticket is waiting for them in the inCust app for customers. Customers do not have to give the ticket number for validation – just provide a phone number or a QR code, shown in the inCust mobile app.

The fourth option is to set up the rules for processing checks to automatically issue coupons for customers. These may be the rules associated with the sale, or the rules of the loyalty program. To do this, you need to go into the rule constructor and set the conditions under which you issue our ticket (coupon).
The fifth option – via the cash register system. A system accesses the inCust platform via API, obtains a unique coupon code and prints it on a check. If the purchase is made online, then the coupon can be sent to a customer’s email or social networks.
The sixth option is quite different – a possibility for a customer to buy a ticket. The functionality of mobile payment through the inCust app is intended to help in this. The platform generates a link in a special format for the website of the ticket-issuing company or the internal news feed in the inCust mobile app. The use of the payment system has been described in other articles. Now, it is worth noting that one can pay for the purchase instantly, using the MasterPass service by MasterCard.
There also exists another interesting option of ticket distribution: a billboard or another physical medium with a QR code on it, available for scanning with the help of the inCust mobile app. The app takes the user to the payment procedure, and after the purchase, the ticket will immediately appear in the customer’s e-wallet.
Validation
To validate and stamp issued tickets, you need a separate Terminal account.
This account should be created on the “Terminals” page in Business Control panel (the page can be reached via “Settings->Termi,alss and salespeople” menu command). Be sure to check the “Validator” type of the account. The employee, who will validate tickets (let’s call him ticket master), should download the free inCust Steward app from Google Play or Apple AppStore. On the main screen of the application, one should enter the login and password of the corresponding Validator account. Done!
Next, the ticket master needs to use the “Customer Service” function, and, next, select the “Scanner” option. With it, the ticket master will be able to scan paper tickets, QR codes from gadget screens, and validate tickets by serial number.
In the application for the controller, you can check or redeem tickets even without their medium.
All validated tickets will be displayed in the Business Control panel and will be available to the company’s internal analytics. In the inCust Steward app, this information is available through the “History ” menu, where all validated tickets are listed. Also, the “Statistics” menu is available, where you can see the details of the ticket campaign.
We would also like to note that, in addition to tickets, the access control function can be arranged in two different ways in inCust. It is possible with the help of customer accounts, where the number of “passes” of the customer can be stored, or with the help of special prepaid cards – an unnamed wallet with a set of money and services. But this is a topic for another article.
If you have any questions – contact us, we will be happy to help you with setting up the procedure!


